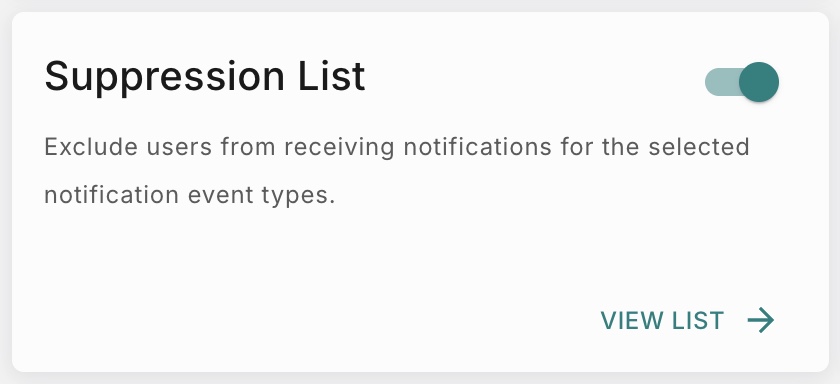
Suppression List
The Suppression List allows you to prevent specific users from receiving certain types of notifications. This is useful to protect delivery rates and avoid sending notifications to unreachable customers.
Users added to the suppression list are excluded from notifications based on the configured event types, channels, and duration.
How it works
When the Suppression List is enabled, you can choose which types of notifications to block for the users added to this list. Any user included will not receive the selected notification types.
To manage a Suppression List:
- Navigate to Add Ons > Suppression List.
- Enable Suppression List.
The Suppression List Configuration modal opens.
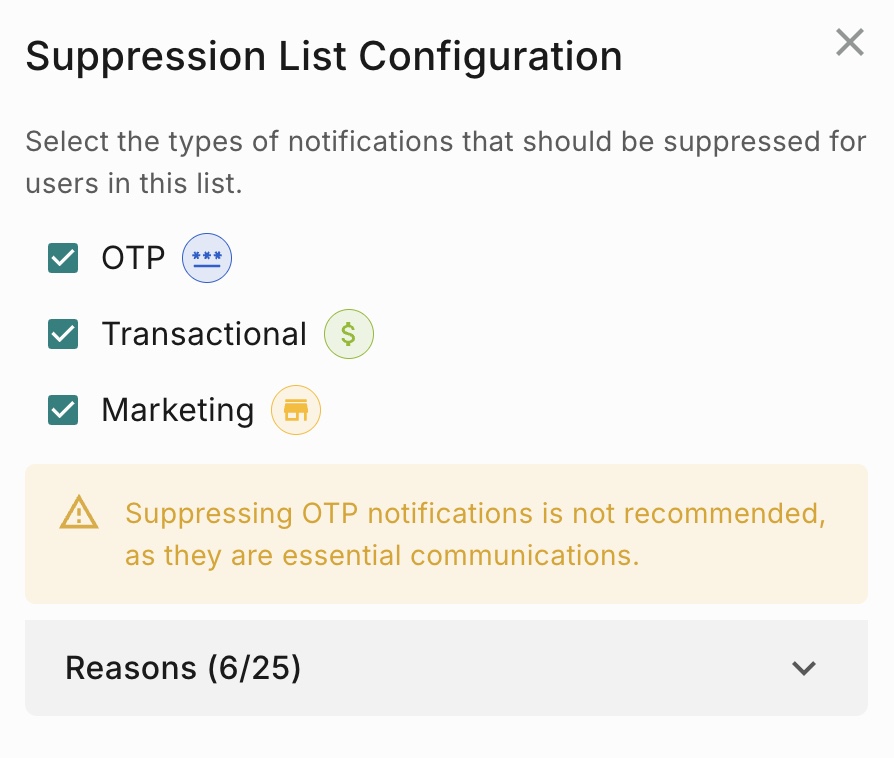
Notification types you can suppress
You can select one or more of the following:
OTP (One-Time Password)
Blocks users from receiving authentication or verification codes.
Important Note: Suppressing OTP notifications is not recommended, as OTPs are critical for authentication and other essential user communications. Enable this option only if you fully understand the impact.
Transactional
Blocks system-related messages such as order confirmations, receipts, or account updates.
Marketing
Blocks promotional messages, offers, newsletters, and campaigns.
Once confirmed, the Suppression List is enabled with the selected event types and reasons.
The dialog includes a Reasons section where users can:
- Select from five default suppression reasons.
- Add up to 20 custom suppression reasons as needed.
View List
The View List section allows you to see and manage all users whose notifications are currently suppressed.
When you click View List, the Suppression List dashboard is displayed, where each row represents a user (Destination / Distinct ID) that has been blocked from receiving certain notification types.
What you see in the list
NOTE: Select Distinct ID if you manage User Profiles in Fyno. Otherwise, select Destination.
Suppression List Configuration in the View List
The Configure option allows you to add, update, or delete suppression settings after the Suppression List has been enabled. Once saved, these settings apply as the global suppression list configuration for the workspace.
When you first enable the Suppression List, you select which notification types (OTP, Transactional, Marketing) should be blocked. However, business needs and communication policies can change over time.
The Configure option allows you to:
-
Correct initial settings
If the wrong notification types were selected during setup, you can quickly fix them. -
Adapt to policy or compliance changes
If your organization updates its communication rules, you can adjust the suppressed notification types without recreating the list. -
Respond to user preferences
You may decide to allow transactional messages again while keeping marketing messages blocked. -
Avoid rebuilding the suppression list
Instead of removing users and starting over, you can simply update the notification types in one place.
NOTE: Custom suppression reasons cannot be edited once created. They can only be deleted. If a custom reason is deleted, any users previously associated with that reason must be added again with the correct suppression reason.
Add Users to the Suppression List
The Add Users option allows you to manually add one or more users to the Suppression List. Any user added here will be blocked from receiving the notification types defined in your suppression configuration.
This is useful when:
- A user needs to be blocked from certain notifications.
- A user reports spam.
- A user should temporarily or permanently stop receiving specific notifications.
Fields in the Suppression List Dashboard
Adhere to the notification event types in the configuration
When this option is checked, the user will be suppressed based on the notification types selected in the Configure settings (OTP, Transactional, Marketing).
Checked (Default): The user follows the same rules as the global suppression list.
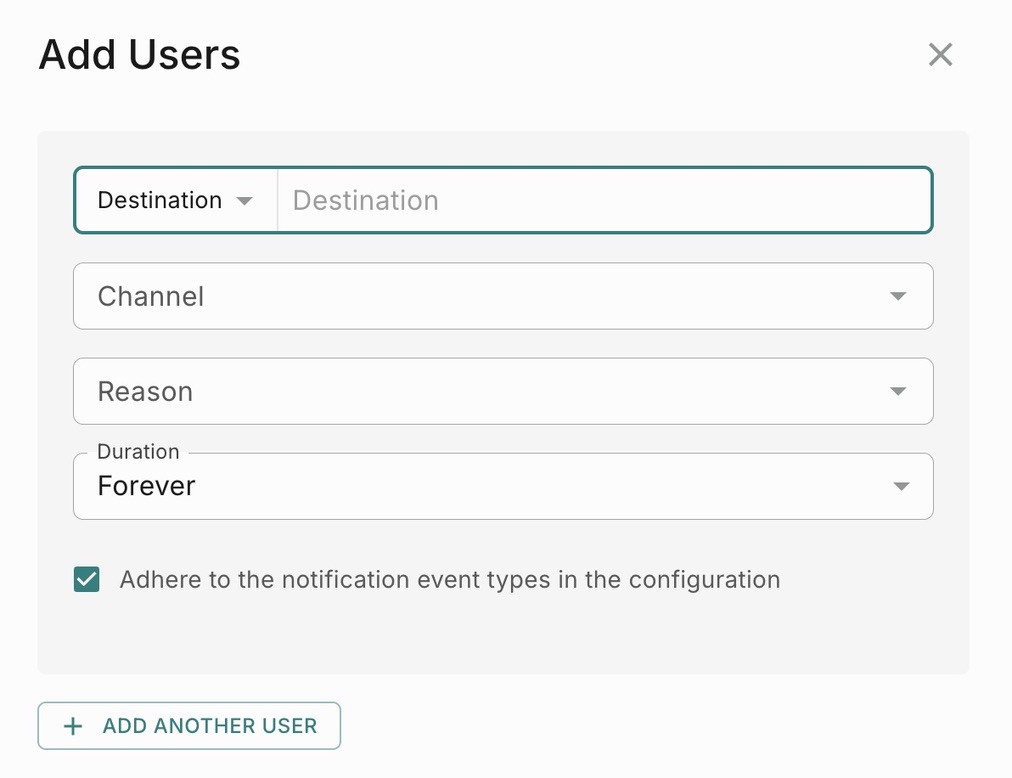
Unchecked: You can manually choose the notification event types for this specific user.
 The user will:
- Not follow the global configuration.
- Be suppressed only for the types selected in the Notification Event Type field.
Uncheck this box when:
- You want different suppression rules for a specific user.
- You need to block only certain notification types for that user.
- You are handling a special request or exception.
How suppression works when adding users
There are three possible scenarios depending on how the “Adhere to the notification event types in the configuration” option is used.
Scenario 1: User follows the global suppression settings (Checkbox enabled)
When the checkbox is enabled, the user automatically follows the global suppression configuration.
You do not need to manually choose notification types.
Result
The user will be blocked from receiving the same notification types defined in the global configuration.
Example:
If the global configuration suppresses Transactional and Marketing notifications, any user added with the checkbox enabled will be blocked from those two types.
Scenario 2: User uses custom suppression (Checkbox disabled)
Assume the global suppression configuration is set to suppress OTP and Transactional notifications.
When the checkbox is disabled:
- The user does not automatically inherit the global configuration.
- You manually select which notification event types should be suppressed.
In this mode:
- Only event types enabled in the global configuration are available for selection.
- Event types not included in the global configuration are not selectable.
- You can choose one or more of the globally configured types.
Result
The user will be suppressed only for the manually selected notification types.
Example:
If the global configuration suppresses OTP and Transactional, and you disable the checkbox and select only OTP:
- The user will be suppressed only from OTP notifications.
- The user will still receive Transactional notifications.
Scenario 3: Global settings change after the user is added
When the checkbox is enabled, the user does not have individual suppression settings. Their suppression behavior is always determined by the current global configuration.
If the global configuration is updated after the user is added, the user’s suppression settings automatically update to match the new global configuration.
Result
The user is suppressed only for the notification types currently selected in the global configuration.
Example:
- If the global configuration suppresses only Marketing, the user will receive OTP and Transactional notifications.
- If later the global configuration is updated to suppress OTP and Marketing, the same user will now also be blocked from OTP notifications.