Workflows
Workflows let you create an automated omnichannel notification experience for your users using a visual workflow builder.
This feature has the flexibility to connect to any third party tool like Mixpanel, Amplitude, MoEngage, Segment or to any web hooks and use conditional blocks to decide who should receive what notifications. You can also design a pre-defined chat workflow where you can send notifications based on user reply. All these can be achieved with ZERO code.
What is a Workflow?
Workflows in Fyno is a notifications orchestration service that allows anyone to easily design intelligent notification flows without coding.
Workflow can be used to:
- Deliver notifications based on notification events created from and data sources like Segment, Mixpanel, Amplitude or any webhooks .
- Deliver notifications based on a user response to a SMS or WhatsApp notification.
- Design a transactional journey flow based on Notification event trigger
- Enables you to call any APIs and the response can be used to determine any conditional flow.
- Send Delivery reports back to your backend system or third party analytics tools like Mixpanel through callbacks.
Workflow as a Transformation Layer
Migrating to Fyno from your current service provider requires no modifications to your existing payload structure. Our workflow is designed to accept any payload format and provides flexible transformation capabilities to match your specific requirements. This migration can be completed without any technical development work on your end.
Key benefits:
- Maintain your current payload structure.
- Utilize built-in transformation tools.
- Complete migration without coding requirements.
- Preserve existing integrations and data formats.
Core Concept
To effectively use workflows, it is important to understand the core building blocks that define how they function.
Triggers
A trigger is the entry point of a workflow that starts execution and passes data into it. Every workflow must have exactly one trigger; without it, the workflow cannot run.
Triggers determine:
- When the workflow is activated.
- What data is passed into the workflow.
- How the workflow connects to internal or external systems.
- Different trigger types are designed for different use cases. Some are event-driven, some are based on user behavior, and others rely on external integrations. Choosing the right trigger ensures that workflows run at the appropriate time, receive the required data, and scale effectively.
- We support the following trigger types in workflows:
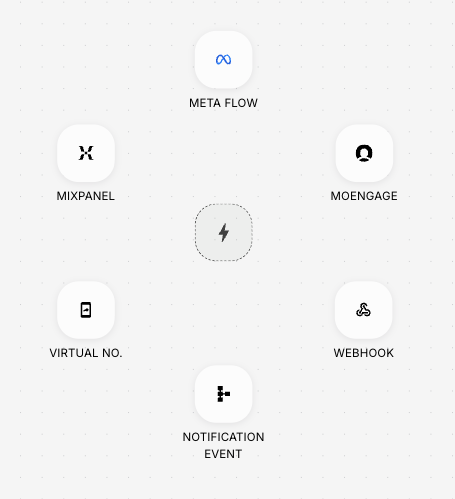
- Meta Flow - Allows workflows to start based on user interactions within Meta platforms such as WhatsApp flows.
- Webhook - Allows workflows to be initiated through real-time API calls from external systems.
- Virtual No - A virtual mobile number with the capability to receive incoming messages can be configured here. If you want to design a workflow based on user’s response in WhatsApp or SMS, then this trigger should be used. Contact support@fyno.io for configuring a virtual number.
- Mixpanel - Create the Workflow using a mixpanel cohort as the trigger.
- Moengage - Enables workflows to start based on events and user activity tracked in MoEngage.
- Notification Event - Allows workflows to start based on the lifecycle of a notification.
How to Choose the Right Trigger
Selecting the correct trigger depends on your use case, data source, and desired behavior.
Use the following guidelines to decide:
- If your workflow needs to start based on backend or system events, use the Webhook trigger.
- If your workflow depends on user behavior tracked in analytics tools, use Mixpanel or MoEngage.
- If your workflow is part of a conversational or interactive flow, use Meta Flow or Virtual Number.
- If your workflow depends on notification delivery or engagement status, use Notification Events.
Actions
Actions represent the actual operations performed within a workflow.
These are the steps where something happens as a result of the trigger and logic defined in the workflow.
Examples of actions include:
- Sending notifications (SMS, Email, Push, WhatsApp).
- Calling external APIs via webhooks.
- Updating user data or attributes.
- Triggering downstream systems.
- Actions are executed in sequence unless modified by conditions. They are responsible for delivering value to the end user or interacting with other systems.
Conditions
Conditions allow you to introduce decision-making into your workflow.
They evaluate data and determine which path the workflow should take next. This enables you to create different experiences for different users based on their attributes or behavior. Conditions typically follow an if/else structure.
Examples:
- If a user is a premium customer, send a premium offer; otherwise, send a standard offer
- If payment fails due to insufficient balance, retry later; otherwise, notify the user immediately
- Conditions make workflows dynamic and personalized, ensuring that users receive relevant communication instead of generic messages.
How Workflows Work
The best way to explain the full scope and capability of Workflows is with an example. So, let’s dive right in.
Company ABC handles payments on its website via an external payment gateway.
The requirement is:
- To send a notification to the customer whenever an online payment succeeds or fails.
- If a payment fails, the Workflow should handle the failure scenario differently depending on the type of customer.
- If the user is a Power User, then convert the payment type to COD and confirm the order by sending an Email and SMS.
- If the user is non-Power User, then send a SMS with a payment link to retry payment.
Fyno’s Workflow makes it simple to operate this end-to-end process.
While Fyno’s notification events will handle the delivery of notifications, the true power of Workflows can be harnessed by calling any APIs as part of the Workflow and creating actions based on the response.
For this example, let’s assume that company ABC has two API endpoints -
-
/customers- aGETendpoint that returns the type of customer. -
/orders/{{customer_id}}- aPUTendpoint that can update the customer’s order details
Here is how the end-to-end process would work:
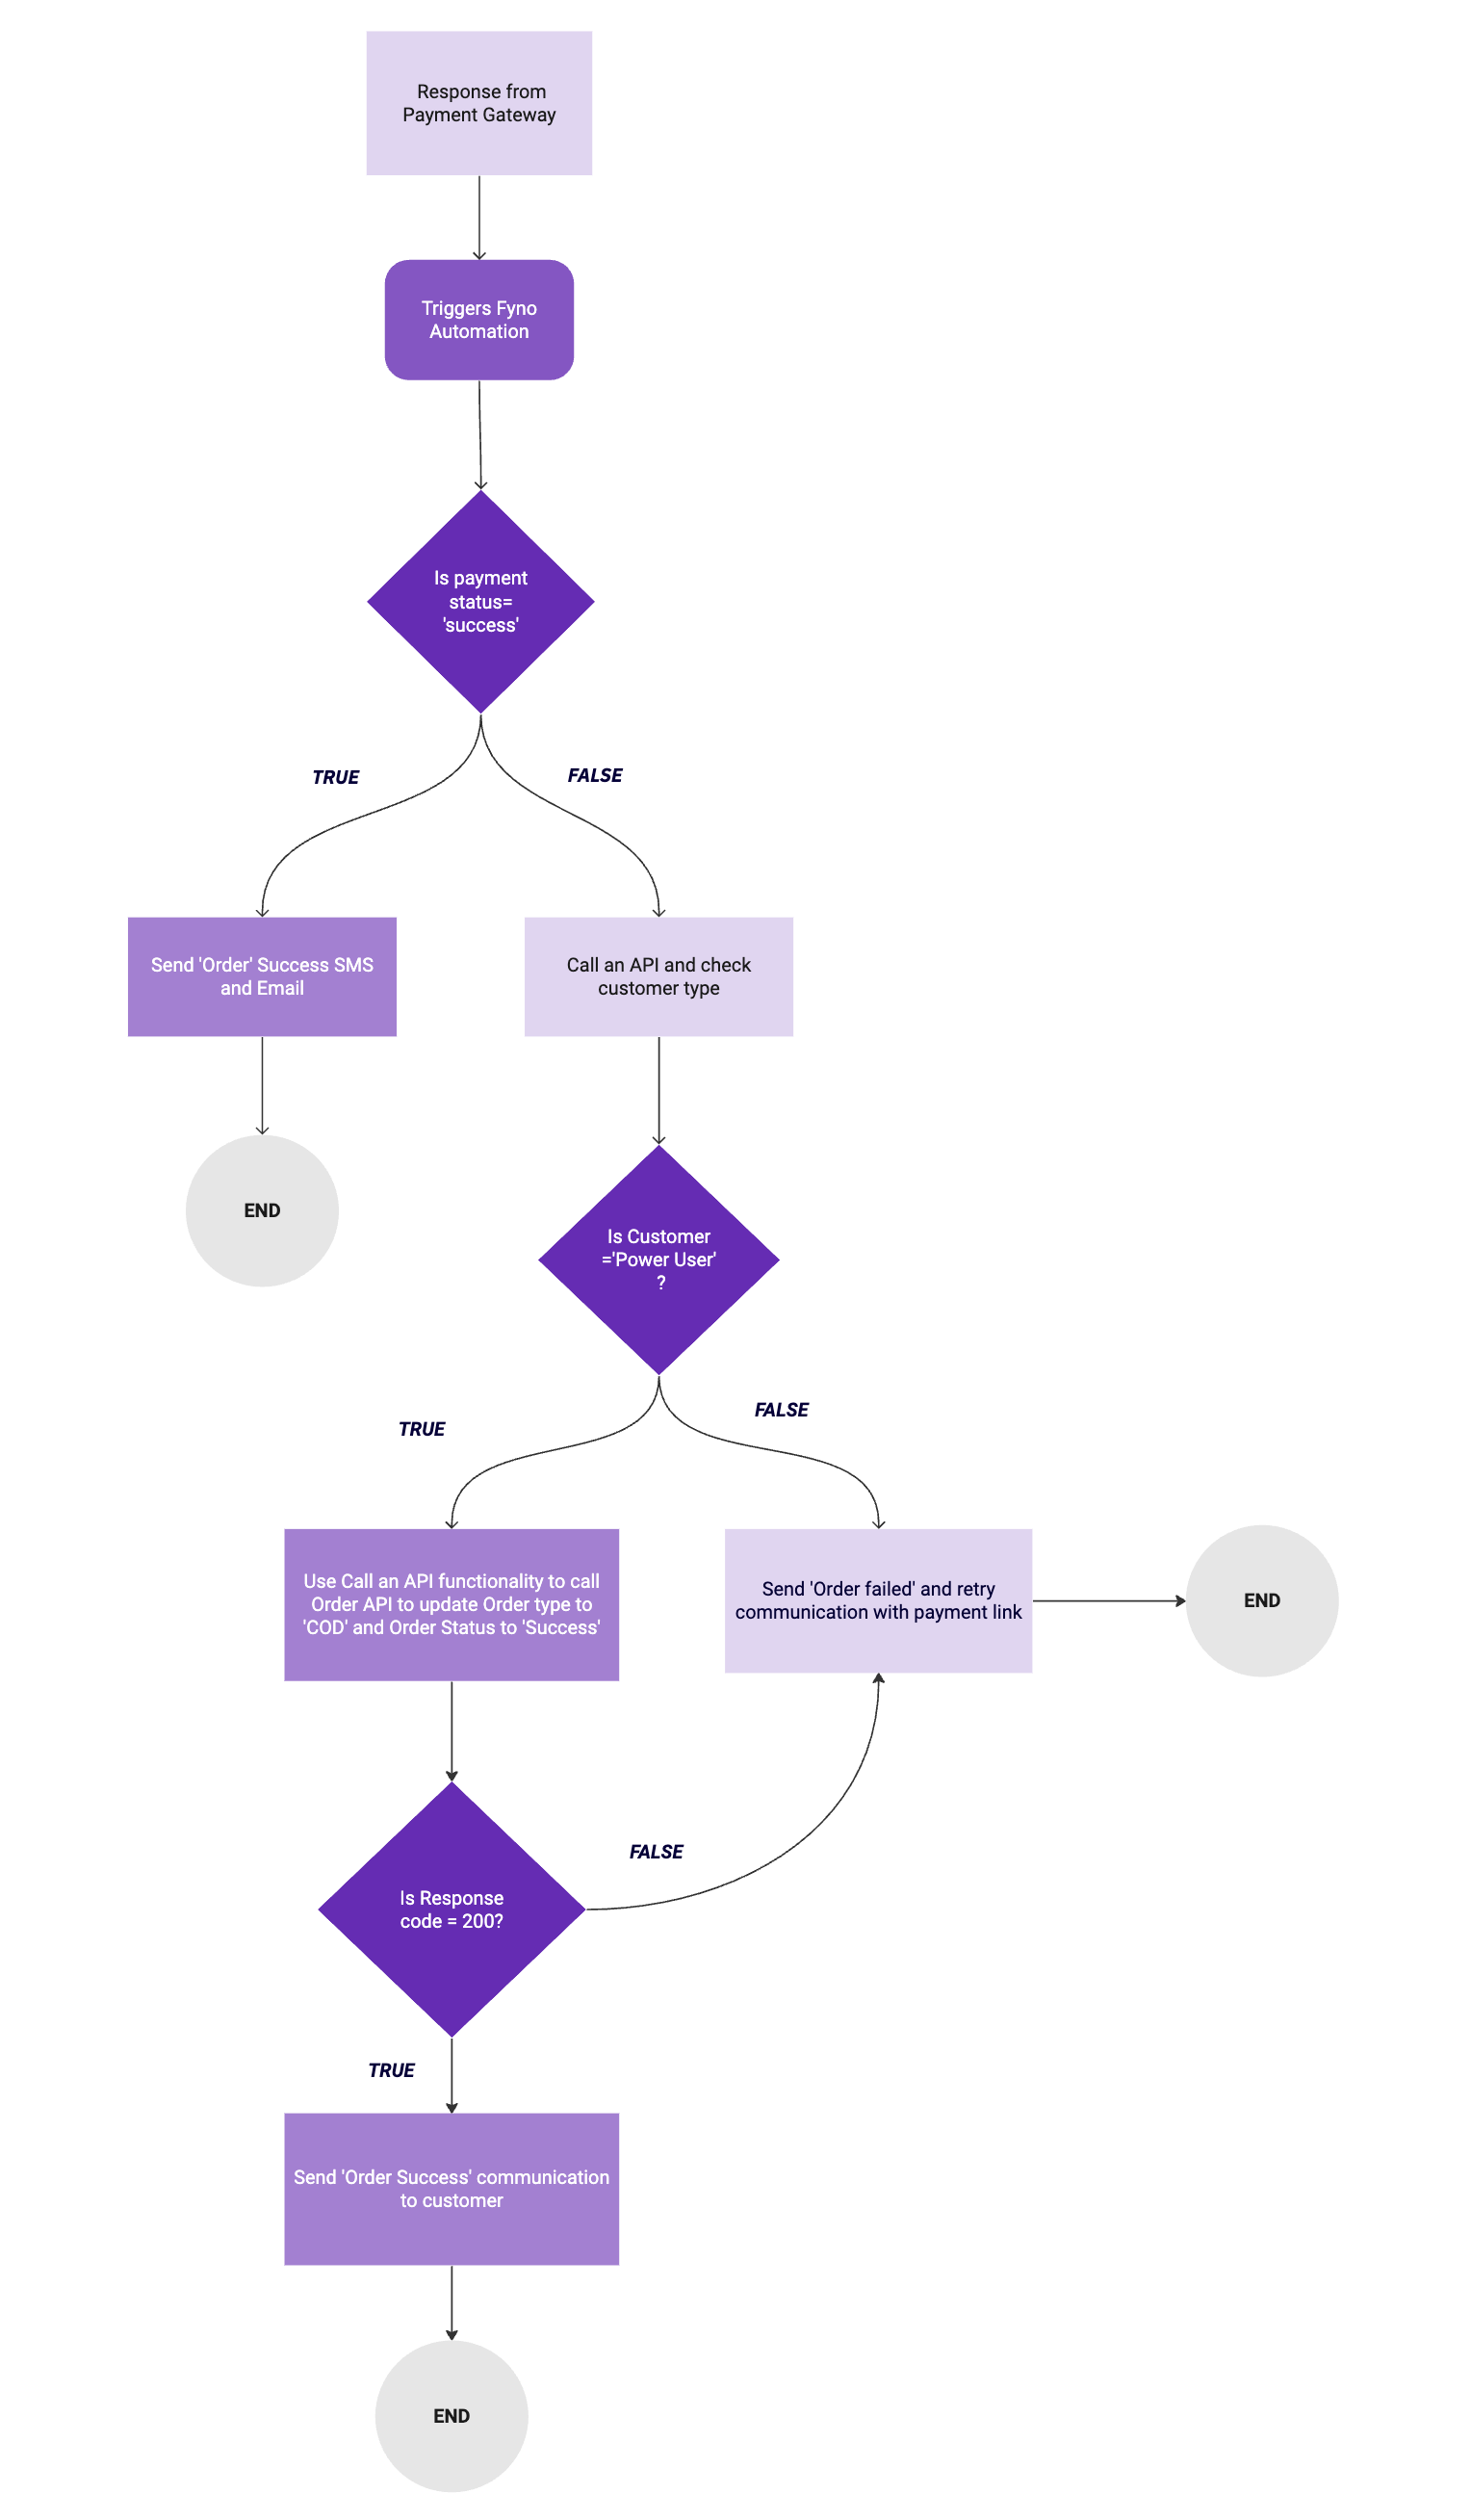
/customers endpoint to get details about customer type./customers./orders/{{ customer_id }}.What would have otherwise required more than a few lines of code to configure, is being addressed with Fyno’s Workflow feature, allowing you to add triggers, provide conditions and decide outcomes, all with a visual understanding of how the entire flow will work.
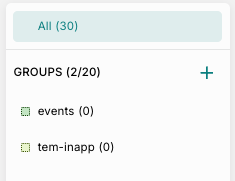
Groups
Groups help you organize related workflows together. For instance, if you have multiple workflows for different stages of a customer journey (Welcome, Onboarding, Engagement, Retention, Re-engagement), you can create a Customer Journey group and assign all these workflows to it. This makes workflow filtering and management more efficient.
How to create a Group
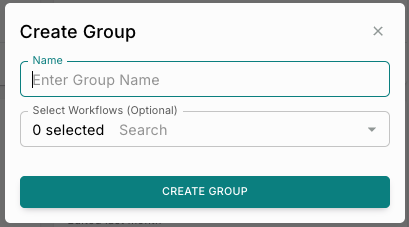
- Groups help organize related workflows within a workspace, making it easier to manage, filter, and navigate workflows. Users can group workflows based on use cases, teams, projects, or any other organizational structure that suits their workflow management needs.
- Workflows can be added to or removed from groups at any time, and a workflow can exist independently of a group. Each workspace can contain up to 20 Workflow Groups.
- Deleting a Workflow Group removes only the group and its associations. The workflows within the group are not deleted and remain available in the workspace.
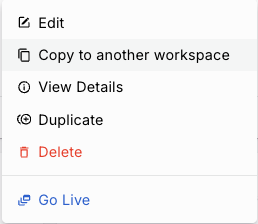
Copying Workflows
Workflows can be copied between workspaces owned by the same user. During the copy process, the workflow configuration is duplicated in the destination workspace.
Steps to copy workflows
1. Prepare your destination workspace
It is important to note that when copying workflows, only the workflow-related data will be copied to the destination workspace. Any dependencies must be created or copied manually in the destination workspace.
2. Copy your workflow(s)
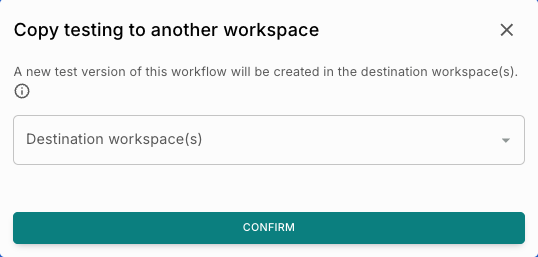
3. Post copy checklist
How versioning works
Let’s say we are copying a workflow from Workspace A to Workspace B. There are two versioning scenarios to keep in mind.
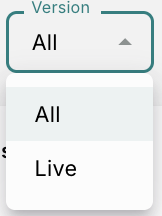
If the workflow does not exist in Workspace B, then the version created by the copy process will always be v1 (Test).
If the workflow already exists in Workspace B, then the copy process will create a new standalone version (neither test nor live). For example, if the version in Workspace B is v1 (Test), then the process will create a new version called v2. You can select this version from the version dropdown beside the workflow name and click “Save” to change the version to v2 (Test), or click the “Go Live” button to promote it to v2 (Live). This ensures that changes to existing versions in the destination workspace are not overwritten and gives you control over when to save or promote the copied workflow.
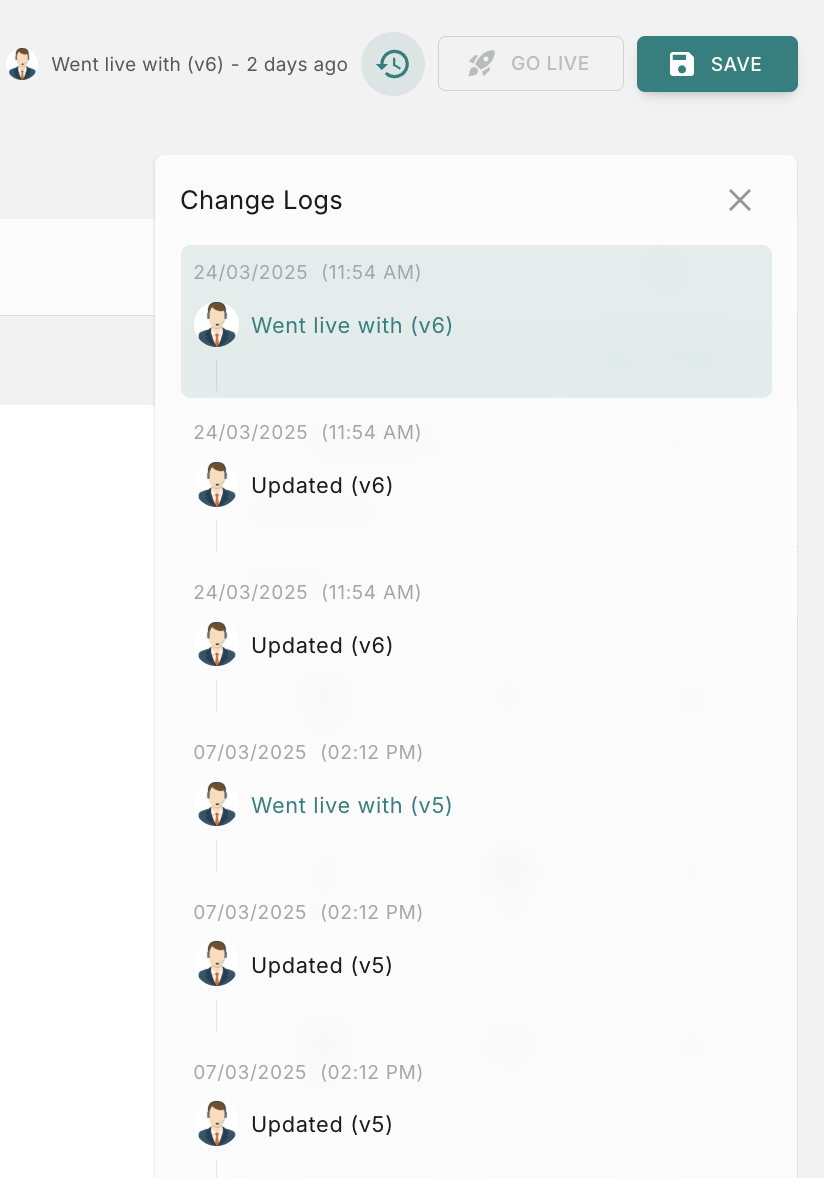
How to view change logs?
To view the history of all the modifications made to a template, you can utilize the change logs feature.
To do so, locate the history icon positioned at the top right corner of the template page, as shown in the image below, and click on it to view the change logs.
It shows the following details
- Who updated it
- Which version was updated
- At what date & time its updated.