Creating a Workflow using Meta (WhatsApp Flows)
Creating a Workflow using Meta (WhatsApp Flows)
Creating a workflow using Meta (WhatsApp) as the trigger source enables you to connect your workflow with a configured WhatsApp integration and select a specific flow that should be executed when triggered. By choosing the appropriate integration and external flow, you define how user interactions on WhatsApp are handled, such as collecting inputs or initiating actions. This setup helps automate communication and ensures that the right experience is delivered to users through your selected WhatsApp Business account.
Meta Flow Trigger Setup
Navigate to the Workflow section from the left navigation panel.
If you have already created workflows, you will see all the existing workflows in a card view. Click Create+ to create a new workflow.
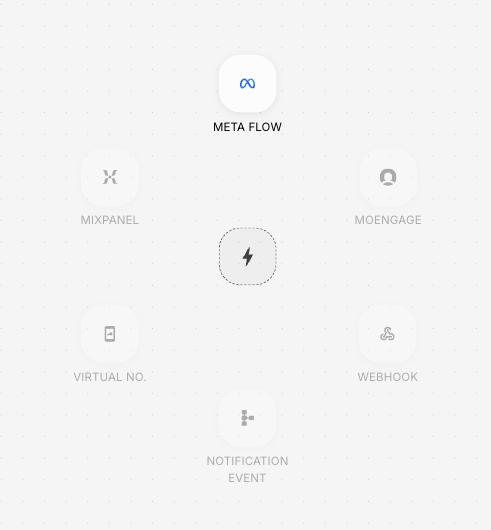
Once you click +Create, the Workflow canvas opens with the list of available triggers.
Prerequisites
Before configuring a Meta Flow trigger, ensure the following prerequisites are completed:
- A valid WhatsApp integration is already configured in your workspace.
- Your WhatsApp Flow is created and published in Meta.
- The external flow is available and synced with Fyno.
- Any APIs that need to be called inside the workflow are allowlisted beforehand.
- You have clarity on the payload structure that should be sent back to Meta screens.
- If your flow depends on dynamic screen rendering, ensure the API response structure is finalized before configuration.
What is Meta Flow Trigger?
The Meta Flow trigger allows you to start a Workflow directly from a WhatsApp Flow interaction. This enables businesses to collect user inputs through WhatsApp-native forms and process them dynamically using APIs, conditions, subflows, and profile updates.
 A common use case would be:
- A customer opens a WhatsApp Flow.
- They submit details such as order ID, mobile number, or booking preference.
- Fyno receives the Flow interaction.
- The workflow calls APIs, validates responses, maps screen data dynamically, and returns the next screen to Meta.
This makes the experience conversational while still allowing backend-driven workflows.
How to Configure a Meta Flow Trigger
To configure a Meta Flow trigger in Fyno, follow the below steps.
Navigate to the Workflow section from the left navigation panel.
If you have already created workflows, you will see all the existing workflows in a card view. Click Create+ to create a new workflow.
Once you click +Create, the Workflow canvas opens with the list of available triggers.
Once the Meta Flow trigger is added, the configuration screen opens.
Under Select WhatsApp Integration, choose the WhatsApp integration connected to your Meta Business account.
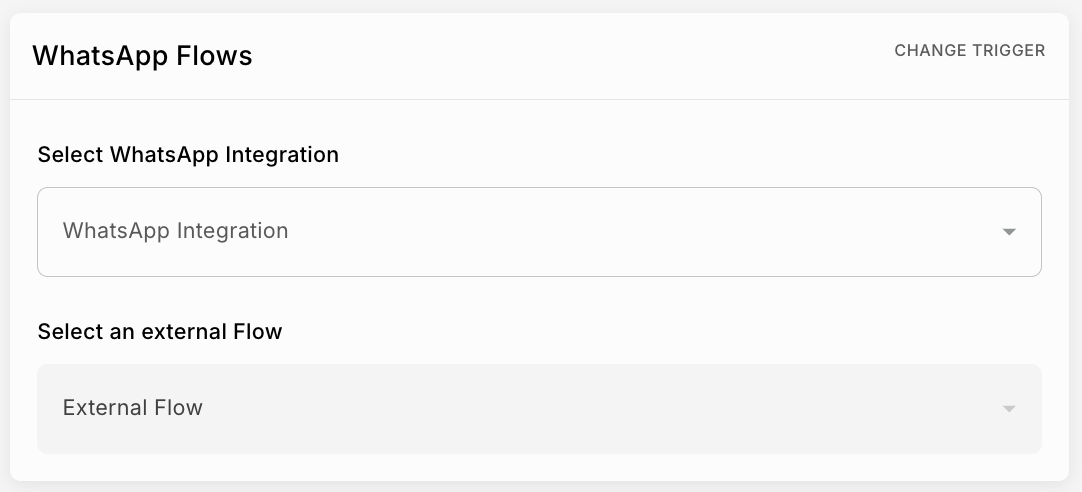 This integration determines which WhatsApp Business Account and Flow configuration will be used for this workflow.
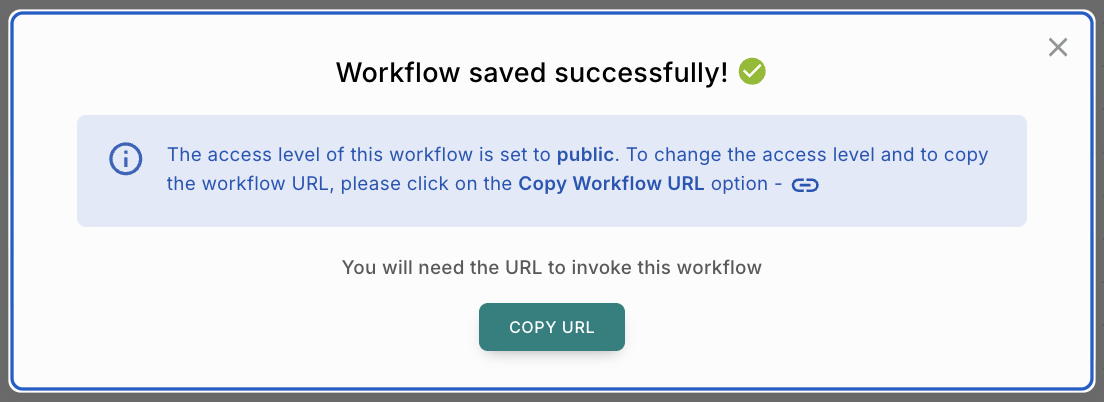
Workflow URL
After saving the workflow, click Copy Workflow URL to access the workflow endpoint configuration.
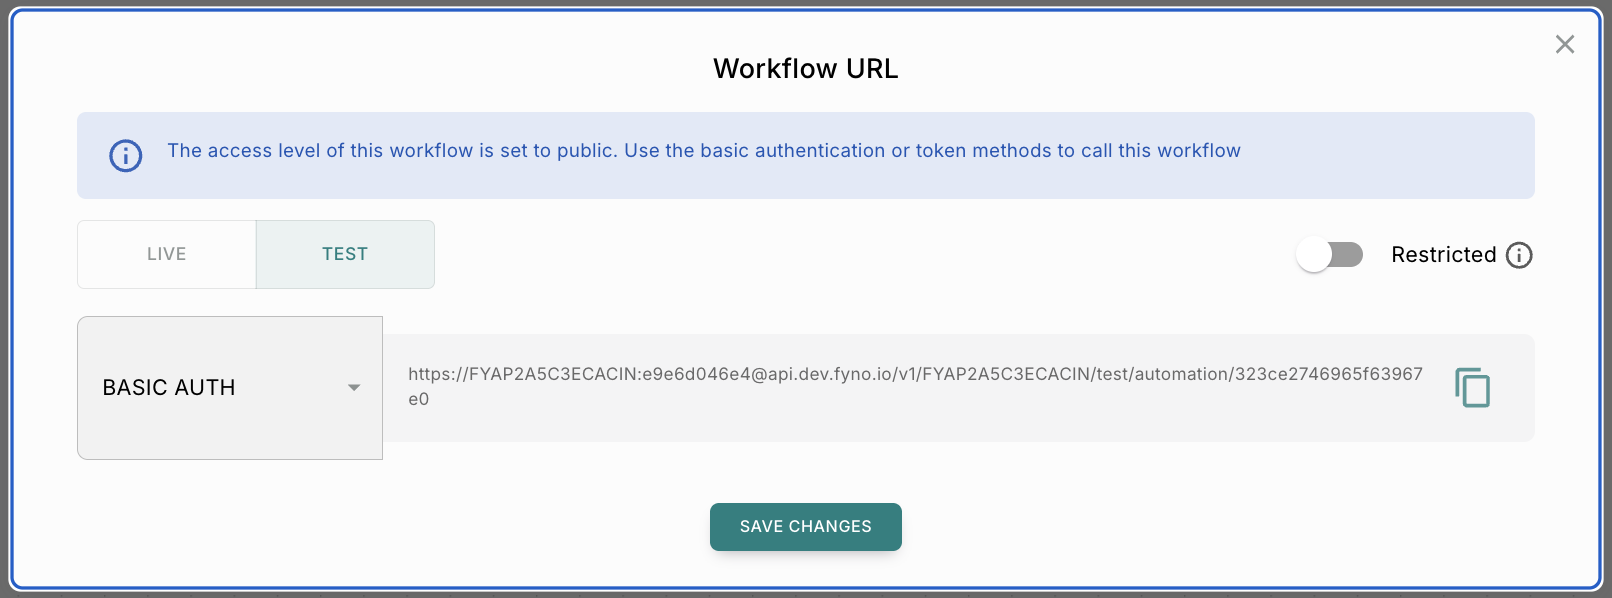 The Workflow URL is the endpoint Meta calls whenever a user interacts with the WhatsApp Flow.
You will see two environments:
- LIVE
- TEST
You can configure either based on your current testing stage.
Public Access
By default, workflows are public.
Fyno supports two authentication mechanisms for public workflows.
Basic Auth
The URL includes:
- Workspace ID
- Token
Example structure:
Token Auth
The token is appended as a query parameter:
This is useful when configuring integrations where query parameter authentication is preferred.
Restricted Access
If additional security is required, enable the Restricted toggle.
Restricted workflows support:
Bearer Token Authentication
Pass the Fyno API Key in the Authorization header:
Basic Authentication
Use the Workspace ID and API Key combination.
Example:
Restricted access is recommended for production-grade implementations.
You can also rotate or customize the token later from the Workflow details page if needed.
How Meta Flow Workflows Execute
Once the trigger is configured, the workflow behaves like a regular Fyno workflow.
After the trigger node, you can add:
- API blocks
- User Profile updates
- Subflows
- Conditions
The Meta Flow trigger acts as the entry point, while the subsequent nodes control the logic and response generation.
Actions Supported in Meta Flow Workflows
API
API actions are commonly used in Meta Flows because most WhatsApp Flows require dynamic data fetching or validation before rendering the next screen.
Typical examples include:
- Fetching customer details.
- Validating OTPs.
- Checking eligibility
- Fetching available appointment slots.
- Retrieving order details.
- Creating support tickets.
API Configuration
To configure an API block inside the workflow, follow the below steps.
Drag and drop the API action onto the workflow canvas and connect it to the Meta Flow trigger.
Once added, the API configuration panel opens.
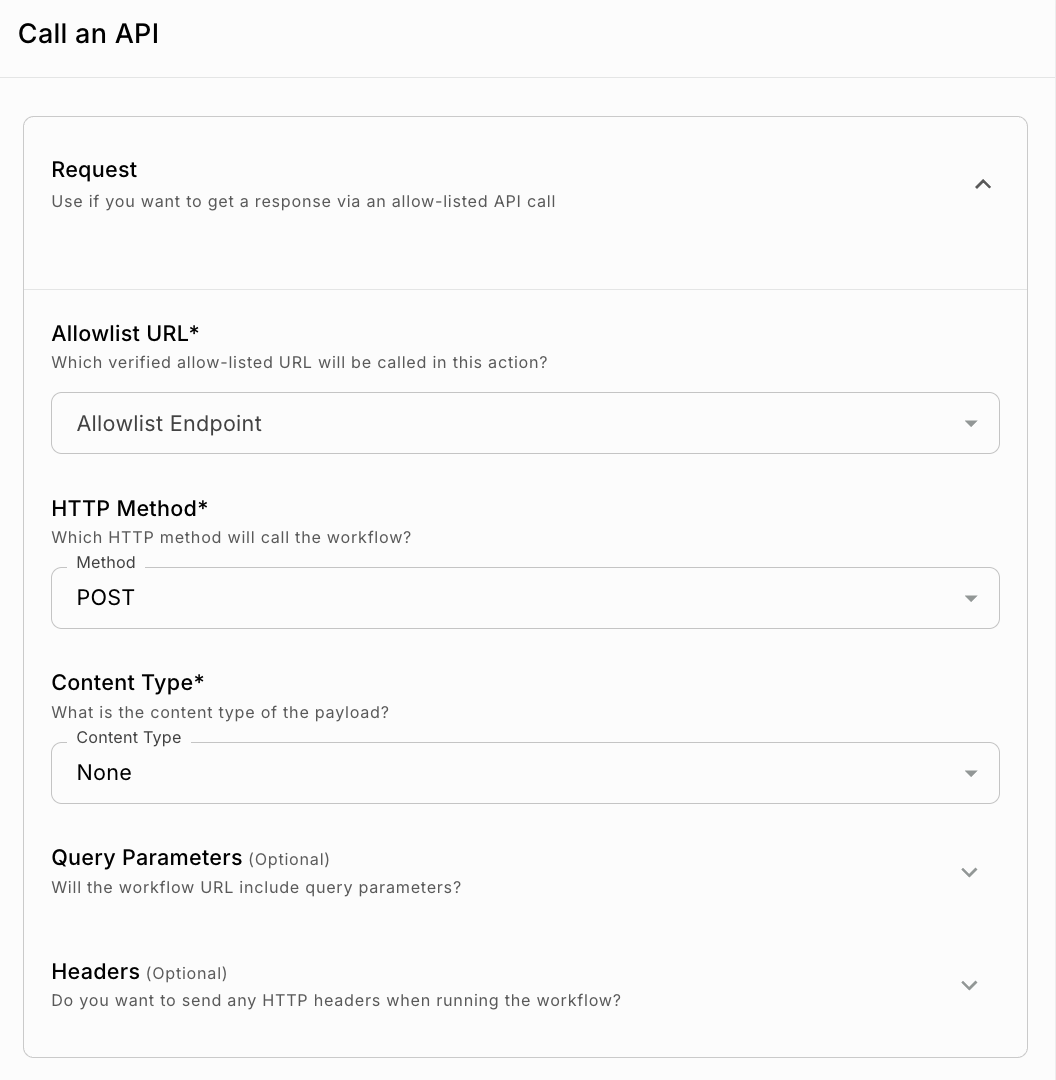
Under Allowlist URL, select the verified allowlisted endpoint that should be called.
Only URLs added in the Allowlist section will appear here.
This restriction ensures that workflows cannot invoke unauthorized endpoints.
Select the HTTP Method.
Supported methods include:
- GET
- POST
The selected method should match the backend API implementation.
Select the Content Type for the payload.
Available options:
- None
- JSON
- Form Data
- URL Encoded Form
- XML
- Text
For most Meta Flow implementations, JSON is typically used because WhatsApp Flow interactions exchange structured JSON payloads.
(Optional) Configure Query Parameters if the API requires query strings.
Example:
Query parameters are generally used with GET requests.
(Optional) Configure Headers if the API requires authentication or additional metadata.
Example:
Headers are commonly used for:
- Authentication
- API keys
- Environment identifiers
- Content negotiation
Under Screen, select the Meta Flow screen that should receive the mapped payload.
Each screen corresponds to a screen configured in the Meta Flow.
Response Mapping for Meta
The Response section is one of the most important parts of Meta Flow workflows.
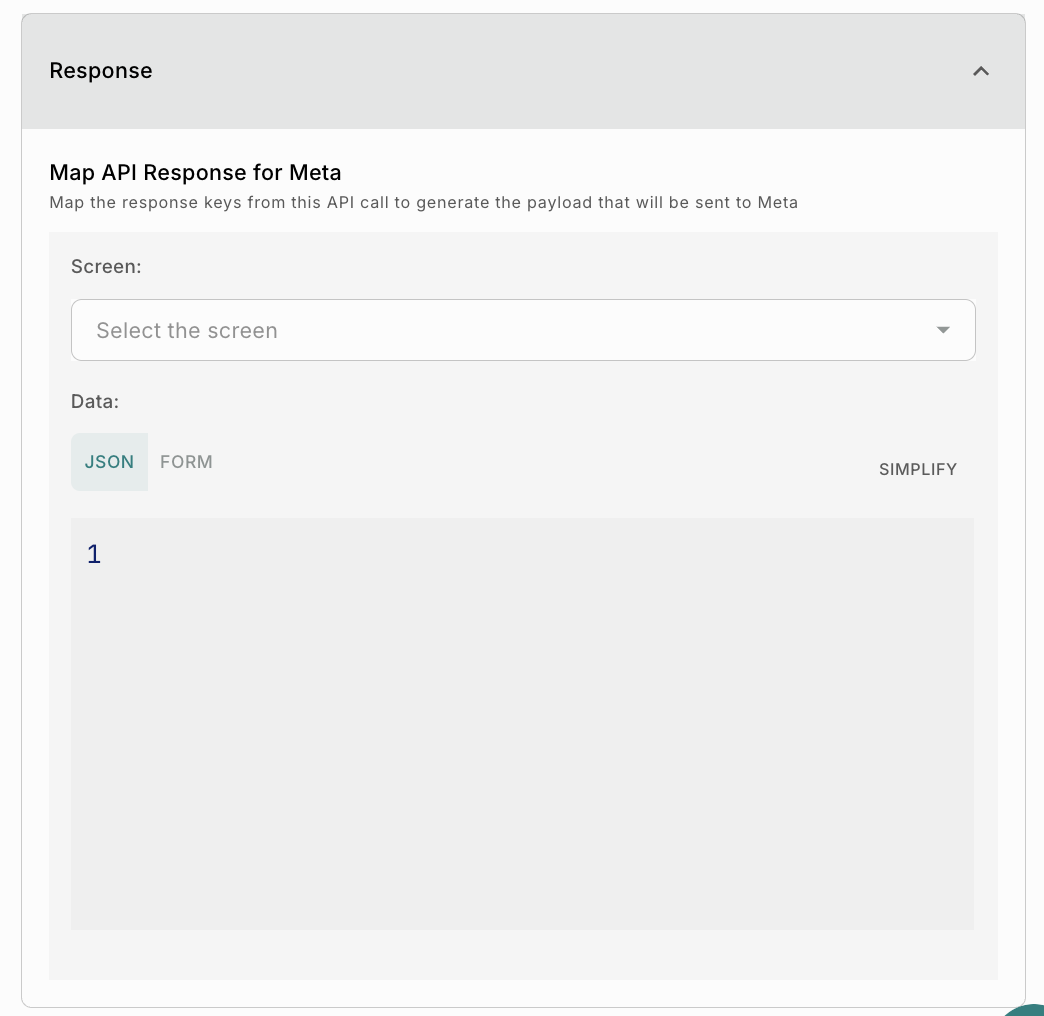 This section controls how API responses are transformed into payloads that Meta uses to render WhatsApp screens dynamically.
JSON Mapping
Use JSON mapping when:
- Nested objects are required.
- Dynamic arrays are needed.
- Complex response structures must be constructed.
- Conditional payload generation is involved.
Example:
FORM Mapping
FORM mode provides a simpler UI-driven mapping experience.
This is useful for straightforward field mappings where deep nesting is not required.
Dynamic Screen Rendering
One of the most powerful capabilities of Meta Flow workflows is dynamic screen rendering.
The workflow can:
- Fetch data from APIs.
- Process responses.
- Return customized screen payloads to Meta.
- Control the next screen dynamically.
For example, an appointment booking workflow may work as follows.
Similarly, an order tracking workflow can work as follows.
This allows WhatsApp Flows to behave more like fully interactive applications instead of static forms.
Conditions in Meta Flow Workflows
Condition blocks can be used after API calls to branch workflow execution based on:
- API response
- HTTP status code
- User selections
- Validation outcomes
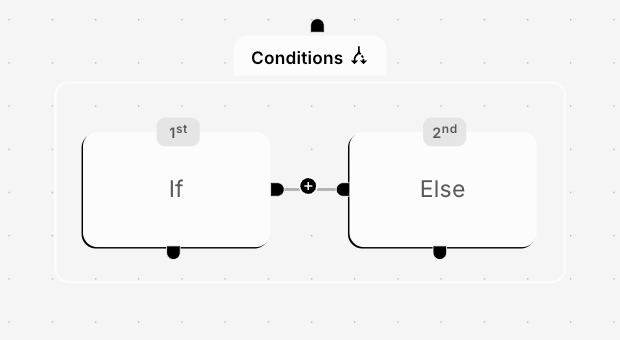
Examples:
- If OTP validation succeeds → proceed to next screen
- If customer exists → fetch profile
- If API fails → show fallback screen
- If slots are unavailable → show retry option
Supported operators include:
- Equals
- Not Equals
- Contains
- Starts With
- Ends With
- Greater Than
- Less Than
- Greater than or Equal
- Less than or Equal
- Is
- Is Empty
- In
- nin
- is boolean
Conditions help orchestrate complex conversational journeys within WhatsApp Flows.
Subflows
Subflows allow you to modularize workflow logic and reuse common functionality across multiple Meta Flows.
Common use cases include:
- OTP validation.
- User verification.
- Eligibility checks
- Shared customer lookup logic.
- Appointment booking flows.
This keeps workflows easier to maintain and scale. You can read more about it here
User Profile Updates
The User Profiles action allows you to store or update customer attributes during the Meta Flow interaction.
Examples include:
- Saving preferred language.
- Updating customer contact details.
- Storing onboarding status.
- Saving booking preferences.
This helps maintain continuity across future engagements and campaigns. You can read more about it here
Important Things to Know
- Meta Flow workflows rely heavily on response mapping. Incorrect payload structures can prevent screens from rendering correctly.
- Always validate API responses before mapping them to Meta screens.
- If your API structure changes, update the mapping configuration accordingly.
- Simplify variables should use meaningful names for easier debugging and maintenance.
- Use TEST URLs during development before switching to LIVE.
- Restricted workflows are recommended for production-grade implementations.
- Keep payloads optimized and avoid unnecessary nesting unless required by the Meta Flow design.
How to raise Approval requests
If your workspace has maker-checker workflow enabled for template management, the ‘Go Live’ action requires an additional approval step. You’ll need to choose from your designated approvers who will review and authorize the template changes.
You can read more about it here